React 타입 정리
class 컴포넌트 타입
React.Component와 React.PureComponent의 타입은 아래와 같이 정리되어 있습니다.
interface Component<P={}, S={}, SS=any> entends ComponentLifecycle<P,S,SS>{}

class Component<P,S>{
	/* ... 생략 */
}

class PureComponent<P={}, S={}, SS=any> extends Comopnent<P,S,SS>{}
각각 제네릭의 P는 prop, S는 state를 의미합니다. React.Component와 React.PureComponent의 차이는react의 생명주기 메서드중 하나인 shouldComponentUpdate를 처리하는 방식에 있습닌다.
shouldComponentUpdate()는 props 또는 state가 새로운 값으로 갱신 되어서 렌더링이 발생하기 직전에 호출됩니다.
React.Component는shouldComponentUpdate를 따로 설정해주지 않은 경우, 항상 true를 반환합니다. 즉,setState가 실행되면 state, props의 변경 여부를 신경 쓰지 않고 무조건적으로 컴포넌트를 업데이트 시킵니다.React.PureComponent에는, props와 state를 얕은 비교를 통해 비교한 뒤 변경된 것이 있을 때는 true를 return 해서 리렌더링 하고, 변경된 것이 없을 때는 false를 반환하여, 리렌더링을 막습니다.
function 컴포넌트 타입
// react 18.2.0 기준입니다.
type FC<P = {}> = FunctionComponent<P>;

interface FunctionComponent<P = {}> {
  (props: P, context?: any): ReactNode;
  propTypes?: WeakValidationMap<P> | undefined;
  contextTypes?: ValidationMap<any> | undefined;
  defaultProps?: Partial<P> | undefined;
  displayName?: string | undefined;
}

type VFC<P = {}> = VoidFunctionComponent<P>;

/**
 * @deprecated - Equivalent with `React.FunctionComponent`.
 */

interface VoidFunctionComponent<P = {}> {
  (props: P, context?: any): ReactNode;
  propTypes?: WeakValidationMap<P> | undefined;
  contextTypes?: ValidationMap<any> | undefined;
  defaultProps?: Partial<P> | undefined;
  displayName?: string | undefined;
}
React 18버전 이상에서는 VFC와 FC의 차이가 없습니다. 두 타입 모두 children을 따로 지정을 해주어야 합니다. React 16버전에서는 FC의 경우 children이 미리 정의 되어 있었으며, VFC의 경우 children의 타입이 지정되어 있지 않았습니다.
18 버전 이상에서는 React.FC 를 활용해서 함수 컴포넌트를 정의합니다.
Children Type
type PropsWithChildren<P = unknown> = P & { children?: ReactNode | undefined };기본적인 children type은 {children: ReactNode | undefined}입니다. ReactNode는 ReactElement 외에도 boolean, number 등 여러 타입을 포함하고 있습니다. 구체적인 타입을 타이핑하는 것에는 적합하지 않습니다.
React.ReactElement, JSX.Element, React.ReactNode
Render 메서드와 함수 컴포넌트의 반환 타입에 대해서 정리합니다. React.ReactElement, JSX.Element, React.ReactNode에 대해 각각 정리합니다.
- React.Element
React.createElement를 호출하는 형태의 구문으로 반환하면, React.createElement의 반환 타입은 ReactElement입니다. 즉 ReactElement 타입은 리액트 컴포넌트를 객체 형태로 저장하기 위한 포맷입니다.
interface ReactElement< P = any, T extends string | JSXElementConstructor<any> = | string | JSXElementConstructor<any>, > { type: T; props: P; key: Key | null; } - JSX.Element
리액트의 ReactElement를 확장하고 있는 타입입니다. 글로벌 네임스페이스에 정의되어 있어 외부 라이브러리에서 컴포넌트 타입을 재정의 할 수 있는 유연성을 제공합니다. 이러한 특성으로 컴포넌트 타입을 재정의하거나 변경하는 것이 용이합니다.
declare global { namespace JSX { interface Element extends React.ReactElement<any, any> {} } } - ReactNode
ReactElement 외에도 boolean, number, string 등의 여러 타입을 포함하고 있습니다.
interface DO_NOT_USE_OR_YOU_WILL_BE_FIRED_EXPERIMENTAL_REACT_NODES {}
type ReactNode =
  | ReactElement
  | string
  | number
  | Iterable<ReactNode>
  | ReactPortal
  | boolean
  | null
  | undefined
  | DO_NOT_USE_OR_YOU_WILL_BE_FIRED_EXPERIMENTAL_REACT_NODES[keyof DO_NOT_USE_OR_YOU_WILL_BE_FIRED_EXPERIMENTAL_REACT_NODES];
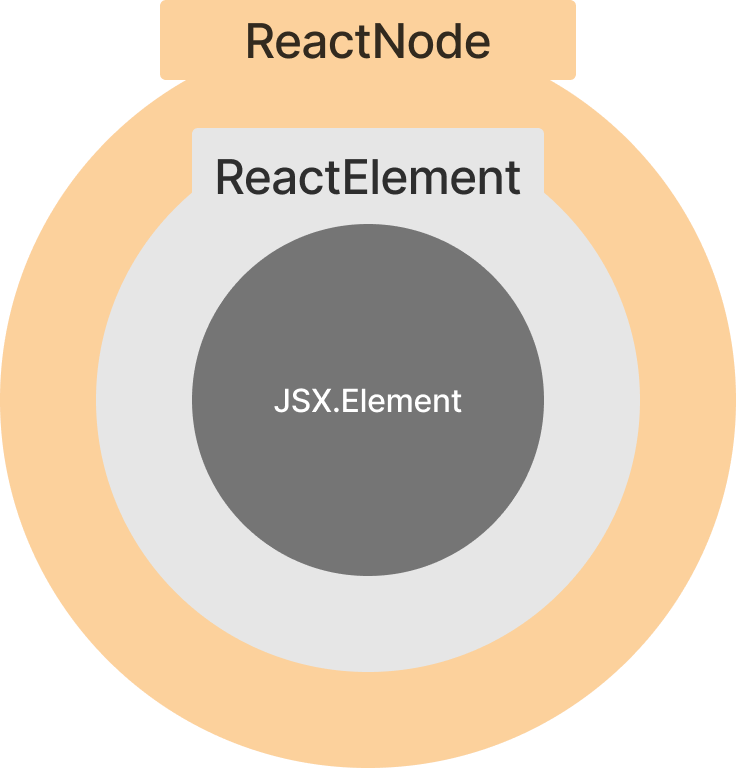
이러한 세 타입의 포함 관계를 살펴보면 다음과 같습니다.
ReactElement, ReactNode, JSX.Element 활용하기
-
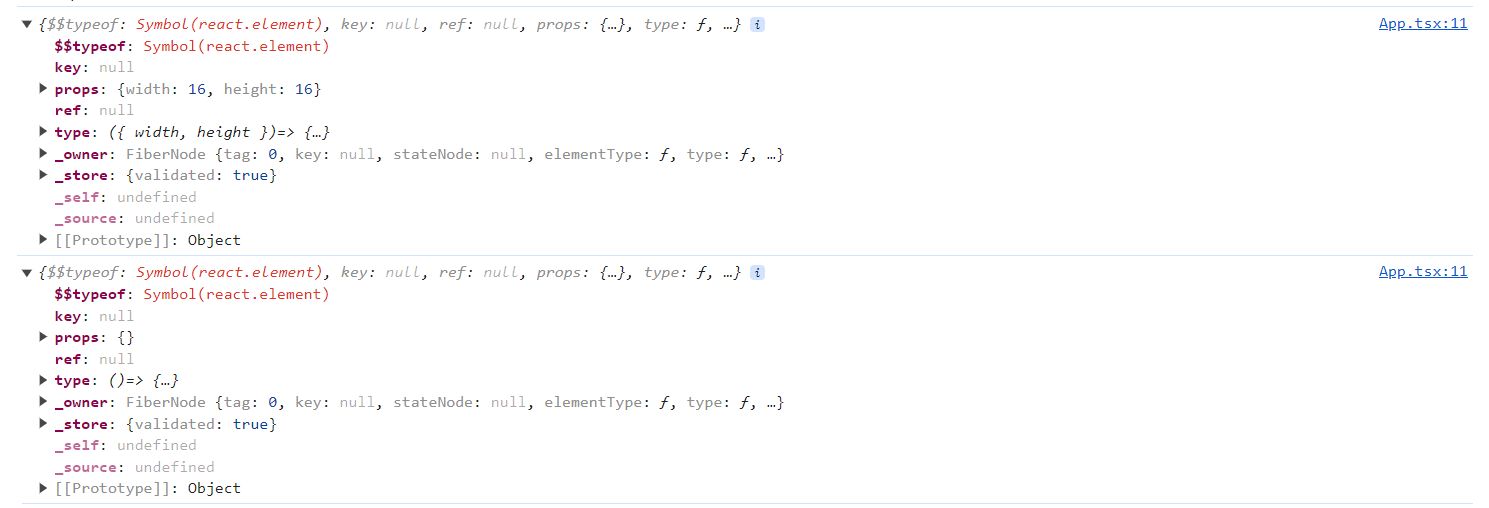
ReactElement ReactElement는 createElement의 반환 값인 객체 타입을 지정합니다. 즉 JSX를 통해 작성한 반환 값을 가상 돔이 읽을 수 있는 creaateElement가 반환하는 객체 형식으로 트랜스파일링합니다. 이때 반환된 객체의 타입은 ReactElement입니다. ReactElement를 사용한다면 제네릭에 직접 해당 컴포넌트의 props 타입을 명시해야 합니다. 이를 통해 icon.props에 접근할 때, 어떤 props가 있는지 추론해 줍니다.
interface Prop {
  icon: React.ReactElement<Svg>;
}

interface Svg {
  width: number;
  height: number;
}

const Item = ({ icon }: Prop) => {
  console.log(icon);
  // 타입스크립트에서 icon.props 내부 값을 추론할 수 있습니다.
  return <li>{icon}</li>;
};

const SVG = ({ width, height }: Svg) => {
  return (
    <svg
      width={`${width}`}
      height={`${height}`}
      viewBox="0 0 16 16"
      fill="currentColor"
      xmlns="http://www.w3.org/2000/svg">
      <g clipPath="url(#clip0_3_6)">
        <path d="... 생략" fill="black" />
      </g>
      <defs>
        <clipPath id="clip0_3_6">
          <rect width="16" height="16" fill="white" />
        </clipPath>
      </defs>
    </svg>
  );
};

const Moon = () => {
  return (
    <svg
      width="15"
      height="15"
      viewBox="0 0 15 15"
      fill="currentColor"
      xmlns="http://www.w3.org/2000/svg">
      <g clipPath="url(#clip0_1_2)">
        <path d="생략" fill="#FFC700" />
      </g>
      <defs>
        <clipPath id="clip0_1_2">
          <rect width="15" height="15" fill="white" />
        </clipPath>
      </defs>
    </svg>
  );
};
export default function App() {
  return (
    <ul>
      <Item icon={<SVG width={16} height={16} />} />
      <Item icon={<Moon />} />
    </ul>
  );
}
-
ReactNode
ReactNode 타입은 리액트의 render 함수가 반환할 수 있는 모든 형태를 담고 있습니다.
ReactNode는 리액트 컴포넌트가 가질 수 있는 모든 타입을 의미합니다. 즉 JSX 문법을 때로는 string, number, null, undefined같이 어떤 타입이든 children prop으로 지정하고 싶을 때 사용합니다. ReactNode는 리액트 컴포넌트가 다양한 형태를 가질 수 있게 할 때 유용합니다.
-
JSX.Element
JSX.Element는 ReactElement의 제네릭으로 props와 타입 필드에 대해 any 타입을 가지도록 확장하고 있습니다.
이러한 특징은 리액트 엘리먼트를 prop으로 받을 경우에 유용하게 사용할 수 있습니다. 내부 타입과 prop이 any이기 때문에 prop으로 넘겨받은 컴포넌트의 상세 데이터를 가지고 오기 쉽습니다.
interface Prop {
  icon: JSX.Element;
}

const Item = ({ icon }: Prop) => {
  return <li>{icon}</li>;
};

const SVG = ({ width, height }: { width: number; height: number }) => {
  return (
    <svg
      width={`${width}`}
      height={`${height}`}
      viewBox="0 0 16 16"
      fill="currentColor"
      xmlns="http://www.w3.org/2000/svg">
      <g clipPath="url(#clip0_3_6)">
        <path
          d="생략"
          fill="black"
        />
      </g>
      <defs>
        <clipPath id="clip0_3_6">
          <rect width="16" height="16" fill="white" />
        </clipPath>
      </defs>
    </svg>
  );
};

const Moon = () => {
  return (
    <svg
      width="15"
      height="15"
      viewBox="0 0 15 15"
      fill="currentColor"
      xmlns="http://www.w3.org/2000/svg">
      <g clipPath="url(#clip0_1_2)">
        <path
          d="생략"
          fill="#FFC700"
        />
      </g>
      <defs>
        <clipPath id="clip0_1_2">
          <rect width="15" height="15" fill="white" />
        </clipPath>
      </defs>
    </svg>
  );
};
export default function App() {
  return (
    <ul>
      <Item icon={<SVG width={16} height={16} />} />
      <Item icon={<Moon />} />
    </ul>
  );
}
JSX.Element 타입으로 prop을 지정할 경우와, ReactElement 타입으로 prop을 지정한 경우의 차이점은
prop으로 전달된 컴포넌트 내부의 prop 요소를 타입스크립트가 추론할 수 있느냐의 여부인 것 같습니다.
prop으로 전달된 컴포넌트 내부의 prop이 반드시 ReactElement 제네릭 타입과 일치할 필요는 없었습니다. 이러한 점으로, 직접 컴포넌트의 타입을 확장할 필요가 없다면, ReactElement를 사용하는 것이 더 좋지 않을까 생각합니다.
그리고 컴포넌트를 전달하는 경우 children을 통해 전달하는 것이 렌더링 최적화에 더 유리하기 때문에, prop 보다는 children을 사용하는게 좋을 것 같습니다.
리액트에서 기본 HTML 요소 활용하기
리액트의 장점은 재사용되는 부분을 컴포넌트로 분리해서 사용할 수 있다는 점입니다.
이때 Button에 같은 디자인이 반복되는 경우 이를 컴포넌트로 분리해서 사용할 수 있습니다. 이러한 경우 대개 다음과 같이 컴포넌트와 타입을 지정해서 사용합니다.
interface props {
  onClick: () => void;
  text: string;
}
const AddBtn = ({ onClick, text }: props) => {
  return <button onClick={onClick}>{text}</button>;
};
하지만 기존의 HTML 요소에는 onClick 이외에 다양한 요소가 있습니다. 혹은 이와 같은 단순한 event 연결 뿐만 아니라, 클래스네임, id 등을 추가로 활용하고 싶을 수 있습니다. 이처럼 기존의 HTML 요소를 확장해서 사용하고 싶을 경우 React.DetailedHTMLProps를 활용합니다.
type DetailedHTMLProps<E extends HTMLAttributes<T>, T> = ClassAttributes<T> & E;button 컴포넌트에 기존의 HTML 요소를 확장해서 사용하고 싶을 경우 다음과 같이 활용할 수 있습니다. 해당 컴포넌트를 활용할 경우 자동으로 button jsx에 할당된 props를 활용할 수 있습니다.
import { DetailedHTMLProps, HTMLAttributes } from 'react';

interface BtnProp
  extends DetailedHTMLProps<
    HTMLAttributes<HTMLButtonElement>,
    HTMLButtonElement
  > {}

const Btn = (prop: BtnProp) => {
  return <button {...prop}></button>;
};

export default function App() {
  return (
    <ul>
      <Btn />
    </ul>
  );
}
자식 컴포넌트에 Ref를 전달하는 경우
DetailedHTMLProps를 활용할 경우 유의할 점이 ref입니다. 리액트에서 함수형 컴포넌트에 ref를 활용할경우
일반적으로 자식 컴포넌에 ref값을 전달 할 수 없습니다.
ref값을 자식 컴포넌트에 전달이 필요한 경우 자식 컴포넌트에서 forwardRef를 활용합니다.
이때 DetailedHTMLProps를 활용한다면, ref를 포함하는 타입을 전달합니다.
실제로는 동작하지 않는 ref를 받도록 타입이 지정되어 예기치 않은 에러가 발생할 수 있습니다.
따라서 ref를 전달하는 경우 HTML 요소 속성 중 ref를 제외한 React.ComponentPropsWithoutRef<T extends ElementType> 을 활용합니다.
interface Btn extends React.ComponentPropsWithoutRef<'button'> {}

/*
  forwardRef의 첫 번째 제네릭은 ref의 타입을
  두 번째 제네릭은 props의 타입을 의미합니다.
 */
const Btn = forwardRef<HTMLButtonElement, Btn>((props, ref) => {
  return <button ref={ref} {...prop}></button>;
});

export default function App() {
  const ref = React.useRef<HTMLButtonElement>(null);
  return (
    <ul>
      <Btn ref={ref} />
    </ul>
  );
}
참조
- 우아한 타입 스크립트
- 모던 리엑트 딥다이브
- class 컴포넌트 타입
- function 컴포넌트 타입
- Children Type
- React.ReactElement, JSX.Element, React.ReactNode
- - ReactElement, ReactNode, JSX.Element 활용하기
- 리액트에서 기본 HTML 요소 활용하기
- - 자식 컴포넌트에 Ref를 전달하는 경우
- 참조